These are one of my absolute favorite cookies. They are fun to make (even though it is a bit of a process), they are yummy, and they are pretty. It's a cookie trifecta! I actually have about 6 different swirl recipes incorporating different flavors, but the process is pretty much the same. One year I made them all and I have to say, it made for a very pretty tin with all those swirled cookies nestled inside. Plus, you can make them whatever color you like--I made them less red and more pink for my wedding and I've made them green for the holidays as well.
This particular recipe comes from Better Homes and Gardens via MSN House and Home, presented as "Sugar Cookie Slices." I picked it up in 2002 and have been making it every year since. I have found that depending on the tools that I use, it is necessary to adapt the recipe. I've noted those changes in the recipe, since I've made this recipe three ways: by hand, using a hand mixer and using a stand mixer. I also swapped the extract from vanilla to almond to give a different depth of flavor.
Almond Swirls
1 cup butter, softened
1 1/2 cups granulated sugar
1 1/2 teaspoons baking powder
1/2 teaspoon salt
1 large egg
1 teaspoon almond extract
2 1/2 cups flour
red food coloring
sprinkling sugar
In a large mixing bowl, beat butter on medium to high speed for 30 seconds. Add sugar, baking powder and salt and cream together, scraping the sides of bowl as needed until combined. Beat in egg and vanilla.
Beat in as much flour as you can with the mixer. Use a wooden spoon to stir in any remaining flour.
If you are not using a stand mixer, don't even bother trying to beat in the flour. It will just turn to a crumbly mess if you use a hand mixer to beat in some of the flour. Stir it all in by hand, in batches. If you do use a stand mixer, swap out your beater before adding the flour. Instead of using the wire beater attachment, use the paddle attachment (or even the dough blade). You want to get all the flour incorporated and create a cohesive dough that you can roll out.
Divide dough into 2 even balls. I just take the whole dough ball and cut it in with a dough blade. Now, take one of those halves and cut it in half again. Form those two smaller pieces into flat discs and wrap, separately, in plastic wrap. Chill for about an hour.
Working on a cutting board or something else to protect your counter top, take the rest of your dough and flatten it a bit. Place a few drops of food coloring into the center and start kneading the dough to distribute the color evenly throughout the dough. This takes a while and red is a tough color, so keep adding coloring until you get the depth of color you want.
Hint: If you get food coloring on your counter top (yup, experience talking), roll the dough over the area (assuming your counter top was clean in the first place!) and it will pick up the excess color. I'm not sure why, my scientist husband could probably tell you about the oils in the dough or something, but for whatever reason, it works.
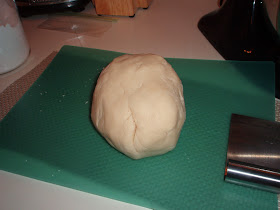
Eventually, you will have a dough ball that looks like this:
And hands that look like this:
Hint: If you know you're going to want two batches, make one batch of dough all plain. Then on your second batch, add the food coloring to the creamed mixture before adding flour. The flour will lighten the intensity of the color, so add a little more than you think you need. This will save you the step of kneading the the color and washing your hands like Lady MacBeth.
As you did with the uncolored dough, cut your dough in half, flatten into discs and wrap, separately, in plastic wrap. Chill for about an hour.
To make your spirals, after chilling, roll each disc into a "8 x8 inch square." See I put that in quotes because I have never in my life been able to roll dough into a square, regardless of my frequency of turning it. And never have I been able to get it to be exactly the same size in both directions. So in my world, I roll the dough to about 1/4 inch thickness.
Hint: I also roll the dough out between pieces of waxed paper. This is important because you can't add flour to the dough for easy rolling (you'll alter the color) and you need the waxed paper to build your swirls.
Using your waxed paper as a guide, roll each of your dough balls to 1/4 inch thickness in roughly the same size and shape. I tend to take mine right to the edge of the width of the waxed paper, and therefore try to keep the length about the same. Make sure you constantly turn the dough and even flip it over. The waxed paper may bunch underneath, so you'll want to smooth out any lines.
Once you have 4 roughly even rolled out pieces, take one white piece and while still covered in waxed paper, lay it on top of one red piece. Shift it around until you have a reasonably good match in terms of shape.
Carefully remove the top piece of waxed paper from the red dough. If some of the dough peels with the paper, gently tap it back into place and press together any seams. Now, carefully remove the bottom piece of waxed paper from the white dough in the same process. Carefully flip the white dough onto the red dough. You've pretty much only got one chance at this, so do it slowly and carefully. But really, if you mess up, it's not the end of the world. Peel the top piece of waxed paper off the white dough.
Smooth out any lines and if you have any over hang, you can "relocate" white dough to where there is none to even out your shape.
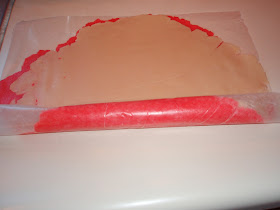
Starting at the bottom, gently and tightly roll the dough, jelly-roll style, removing the waxed paper from the bottom as you go.
For me, the middle of the dough tends to be thicker than the ends, so don't be surprised if your dough doesn't "seal" on the ends. We'll address that later. You may want to tap those ends in, so it doesn't fall apart, but just focus on rolling into a tight spiral.
Remove one roll from the refrigerator and using your sharpest knife, cut the dough crosswise into 1/4 inch slices. I like to cut the whole roll in half, and then work from the inside out. Wipe the knife occasionally to remove any excess dough. When you get to the ends, keep cutting, even it the spiral is weak or it falls apart a bit.
Place on an ungreased or parchment/silicone lined cookie sheet. Sprinkle with sugar, sanding sugar, or crystals.
Bake in a 375 degree F oven for 8-10 minutes. You want to catch these cookies just before the edges turn brown because you don't want that to impact the pretty color. Turn baking sheet 180 degrees halfway through. If using more than one sheet at a time, rotate positions in the oven for more even baking. Cool on cookie sheet for a few minutes, then move to complete cooling on rack.
Now for those pesky ends.
This is still useful dough. You may notice in cutting that some of your spirals have a little hole in the middle.
Use your ends to fill them in! Create swirls where there weren't any by gently tapping in dough. During the baking process this dough will adhere.
And if you still have extra leftover, bake it up and feed it to your husband. Because he knows you can't put the broken ones on a pretty holiday platter.
Makes 4 1/2 dozen
Happy Baking,
The Cookie Princess


No comments:
Post a Comment